drkne
padawan Step 1
 Flock Concepts Member!
Posts: 23
|
Post by drkne on Sept 18, 2012 20:20:44 GMT -5
I'm reaaally hoping I can get some quick advice on this before I end up spending a lot of money on something that doesn't even work. I have NO electrical know-how, so please keep your explanations simple for me. I'm an artist and I've worked with a lot of mediums, some computerized, but when it comes to mechanics, I'm pretty naive. Ok, I've been working with Asian Ball Joint Dolls recently and there are currently NO hair options for them that would mimic any sort of crew cut or buzz cut. The head sizes typically have about a 9 inch diameter cranium, so it's a fair size field to work on. I got the idea to look into electrostatic flocking when I remembered watching a making of documentary of the live action version of 101 Dalmations where they used the process to flock the puppies to get a realistic fur coat on them. Thing is that as much as I have read about the process in the last 3 days (I know that's not much, but kind of seems hard to find detailed information in layman's terms) I have not been able to figure out if I can substitute in certain areas or not. So here's the idea... I would create a head peg mold from the head that I wish to create a wig for, shrink wrap it, brush on a coating of clear silicone that thins around the edges. Let cure. Add an additional layer of silicone to keep it thicker in the center, tapering off at the edges. This creates the silicone cap base. It's a bit similar to anti-skid silicone caps like this except that it will be custom fitted for a particular head and cover the needed areas:  Now at this point I'm wondering for the adhesive, could I just use more silicone? Or would I have to use a special adhesive to get the flock to stick to the silicone cap? I was thinking I could apply adhesive in one small area at a time and gently blow the fibers in the direction I want them to lean (read that this is possible). Force cure, or wait for cure, depending on what adhesive I use, rinse and repeat. Use an electric shaver when done if needed. I know that this will be a loooong and painstaking process, but if I can make it look decent it will be worth it. Also, could I use synthetic hair trimmings or mohair trimmings as flock? Mohair seems like it might be too light and fluffy to work, but couldn't hurt to ask. I cut wigs, so I have trimmings from those and thought it would be nice to be able to recycle them. I'm hoping to achieve hairstyles in various lengths and shapes, something akin to these: 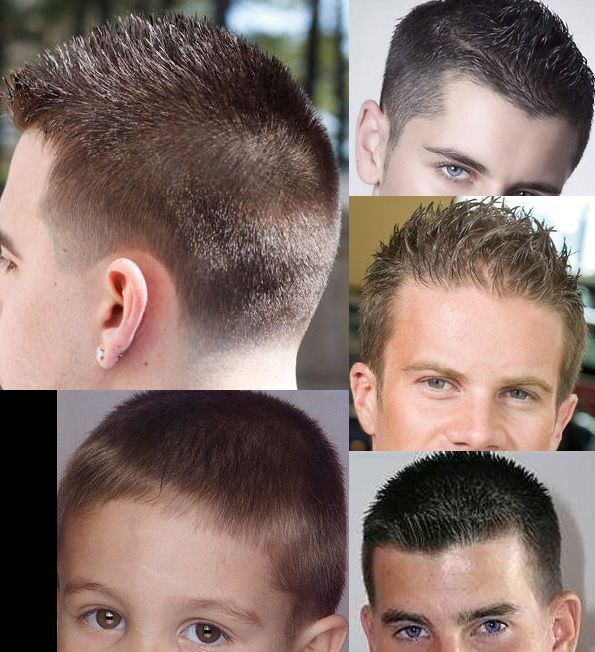 So is there any possibility of this working? And if there is, would I be able to use this electrostatic flocking stick? It's $119.95 and the only one I could find that was less than $1,000. www.craftflocking.com/shopping/pgm-more_information.php?id=258&=SIDFrom what I gather, I would also need to find a way to place a surface under the silicone cap to attach the wand to so that the fibers will be attracted in the right direction? Any help is greatly appreciated. Thank you! -Amy |
|
|
|
Post by Ray (Flock Man) on Sept 24, 2012 17:11:26 GMT -5
I know I answered your email, but some of this may help another.
Hello Amy,
You could use the silicone as an adhesive if the wet time is long enough and if it is thin enough for the flock fibers to embed into. If it will maintain a hold on the fibers- I’m not sure of. A flock adhesive has to be the consistency of something like white glue (elmers thickness) If the glue is too loose and flock over 1mm will not hold. Too thick and it won’t penetrate. Then you have to consider the two materials. Will silicone stick to nylon or rayon flock fibers ( this I can say for sure).
Next you have to think about the size or area you want to cover. Will you be able to apply adhesive and then the flock in before the glue sets or starts to skin.
Then fibers. I’ve worked with Nylon and Rayon fibers and these are finished (coated) with FlocTan (food grade tannic acid) or the like, which gives the naturally static charged Nylon and Rayon a neutral charge (or rather a positive and negative pole ). These fibers need to be active so when static is applied (from a flocking device) the fibers will jump to a grounded surface. I have seen suppliers that carry other types of treated fibers (wool, acrylic, and etc.)
How these other fibers work I’m not sure because I haven’t worked with them. I imagine the same as the nylon or rayon.
See back when I started to learn this flock fibers were near impossible to buy unless you wanted to spend a few thousand bucks for an order and that was for just one color. This was due to me not really knowing what I needed and trial and error costs a bundle. At any rate, I used the money to make my own instead and through a year of trial and error I finally worked it all out. As far knowledge, it was a great experience, but on the wallet side I never recovered what I spent. In doing this I learned to Cut, Dye, and later treat for electro-static finishing. Being thick headed and not wanting to spend the price per pound I spent even more in the long run. My point in telling you this side stuff is that without a finish treatment most fibers will not react in a static field since they already have a static charge.
I have worked with .5 mm up to 8mm fibers- so I’m not sure how longer fibers will react. I do know that when using the longer 8mm fibers, I mix in shorter lengths as a fill in to make the flocked area denser.
The unit in your link seems pretty good 18kV (18,000 volts) should be enough for most hobbyist tasks and many professional work as well.
It all comes down to practice in the end. I learned to flock in a few hours, but it took a lot longer to get it right and then it took about 2 years to get to the point where I could offer it to others.
This may have been a quicker process if I just took the hit and bought the expensive equipment and commercial fibers. See the super high voltages on high end devices can make up for any lacking skills, but know I’ve talked to people who have bought the big ticket devices and had trouble getting things right. I think once you’ve worked out all the bugs and get your system down, you’ll be set.
Yes the fibers will stick out even all over the head and once the head is full you can angle it the way you want (within reason) meaning as long as you don’t pull the fibers out of the adhesive. After styling the longer flock fibers- I will run the head through the flocker again to fill it in more. I do this a few times until I get it the way I want.
Doing the flocking on your project in strips may work for you depending on the length of the flock fibers. Heavier fibers will want to lean over because of the weight verse the glue thickness. The rule of thumb in flocking is to do the entire piece at once to get a plush look, but since you intend to lay it over like real hair, you could start at the back and work towards the front in maybe one inch bands. All this is guess work for me really, but I’m thinking it’s the way I would approach it.
Thanks
Ray
|
|
drkne
padawan Step 1
Flock Concepts Member!
Posts: 23
|
Post by drkne on Sept 25, 2012 17:27:49 GMT -5
Thanks again for the info Ray! Now I have more questions for you...
I got the static stick yesterday and did some experimenting today. None of my experiments were successful, but I knew that they might not be in light of the things you told me, but I thought it would be worth a try before buying more stuff.
I had some mod acrylic shavings from doll wigs that were about 4mm. For adhesives, I tried Elmer's glue, casting silicone rubber and clear setting silicone. Only 3 or 4 hairs would stand up on any of them.
This might seem moronic, but again, no harm in trying, but I had read that you can neutralize static charge with fabric softener, so I tried using that on the fibers and that didn't help.
I think the clear silicone might have been too thick, but the elmer's glue at least should have allowed the fibers to penetrate if I had done things right but they weren't embedding.
So is there a way that I can treat the mod acrylic or acrylic fibers to make them useable?
Or do I HAVE to buy prepped ones somewhere? And do you have any advice on what kind of fibers would make the most realistic hair? I'm thinking I'd like to get 2-10mm fibers. Experiment with the sizing a bit.
Also, many of the links in the link section are dead, or it seems to be rather difficult to find a way to order, or even find pricing information.
Wish i could get in touch with the guys who did the 101 Dalmatians thing I was talking about! That's exactly what I need to do. I can't even find the video again.
|
|
|
|
Post by Ray (Flock Man) on Sept 25, 2012 18:57:00 GMT -5
I do need to recheck the links because they many are dead. Save yourself the trouble and buy commercially made flock fibers. Many times you can get a few longer colors in Tan or blond (may be called wheat or straw) from model Train websites. Some even have black and dark brown, but beware that many on the Train sites have some greens mixed in because they are used as static grass for dioramas’. Treating the fibers with scent free dryer sheets only can work at very high humidity, but this is a very fine line with a lot of trial and error and for the most part you won’t be completely happy unless the fibers are 2mm or less. I wouldn’t suggest treating your fibers with flocTan because of its cost- ($500+ per drum) with I think a 5 drum minimum, and that’s if they’ll sell it to you. Plus to treat fibers you are looking at even more in prep chemicals. Trust me on this- $50.00 a pound for fibers is cheaper than doing it yourself. Donjer will also make fibers for you. Last I knew it was something like $75+ per pound for 6mm. This may be more these day with the rising fuel costs, but in the time and money you’ll save it’ll be worth it. You can order fibers from the UK (flockBiz) or something like that www.flocking.biz/index.html, but the shipping and duty fee equal out to just buying them from DonJer. The UK flock does work out to be 2 pounds for the price of one here in the States, but again with the shipping etc. it’ll be an extra $150 or so. The duty bill came in the mail a few months after I received my flock from the UK. I just checked the link and see that they carry up to 10mm and they may have an option to buy smaller bags off flock. I know the UK flockers have a wide range of sizes to offer in their services. On my end it’s just hasn’t been cost effective to offer about 2mm in my reflocking service. Elmers glue is fine for testing, but it won’t hold long with any kind of handling. Plus like most white or PVA wood glues- it’s brittle and remember most heads are made of plastic that PVA glues don’t stick to for long. IF you can’t thin the silicone (provided that silicone even will work) You may be looking at getting some kind of epoxy, polyurethane, or an acrylic glue. Your glue will have to have some flex to it as well or it my crack with pressure (like squeezing the head or wig, etc. You may also need some type of primer. Auto parts stores have options for this. Silicone and many plastic or soft PVC items tend to be very slick or greasy as I call them- so it’s a challenge to find adhesives off the shelf that hold. My advice would be to contact Jill at DonJer www.donjer.com/index.htm and tell her what you need and she'll give you the run down. |
|
drkne
padawan Step 1
Flock Concepts Member!
Posts: 23
|
Post by drkne on Sept 27, 2012 11:54:08 GMT -5
Thanks so much again Ray!
Just had to do some more experimenting to rule out some cheaper household alternatives and learned some cool stuff! could be helpful to some.
The most successful trial seems to be the clippings that I sprayed with Static Guard. When I shook them onto the adhesive, they stuck up very nicely. Problem is when I turned off the current, they fell limp T_T So I guess that means I have to find the right adhesive? I tried Elmer's glue and I tried silicone again, same results for either, so at this point, I'm not sure if it's too thin or too thick or what...
Besides the Static Guard, I had also tried liquid fabric softener mixed 50/50 with water, but not sure if I had wet the hairs too much, or if it simply didn't work, because even after they dried, the fibers were too clumped together and I could not get them to separate well at all. The fibers sprayed with the Static Guard barely even stuck to my fingers.
I also thought perhaps I could strengthen the current by backing the flocking surface with a more conductive material (in this trial aluminum foil) and sticking the flocking needle through the flocking surface into the foil. I'm not really sure if this helped much or not... I forgot to do an experiment with the static guard treated fibers without foil to compare.
If that actually helps though, theoretically, does that mean that more conductive metals would be better, like if I was insanely rich and could get a clump of gold, would that make the attraction stronger?
|
|
|
|
Post by Ray (Flock Man) on Oct 5, 2012 15:52:07 GMT -5
This is a prime example of how the snowball effect starts and why it can cost more over the long haul of the project. See, I’m a bit hard headed an approach things with the mind set of if others can do it I can research and find out how to as well. This works pretty good for many projects. I’ve always stood by the old saying of, “The reasonable man adapts himself to the world; the unreasonable one persists in trying to adapt the world to himself. Therefore all progress depends on the unreasonable man.” George Bernard Shaw. …..But on some things in hindsight, it may have been better to just go with the flow… This being said, what you are leading to next is research on aqueous solutions -anionic, nonionic, and cationic treatments and chemicals. First there will be a prep. consisting of a wash and scour of the fibers. This will clean away contaminants and prepare the fibers for treatment. Soda Ash type soap. Next you’ll need wet solutions Surfactant ( anionic, nonionic, and cationic solutions) . Then on to other chemicals like ammonium sulfate, Acetic acid, aluminum sulfate. This leads to tannic acids, which leads to softeners and other textile finishing chemicals. www.natural-specialities.com/natural-specialities/en/8448-flock-finishing.htmlWhat will happen is at each turn you’ll justify the expense by saying, “well I’ve gone this far… and there are just a few more steps.” Then there is the sequence in which you’ll have to do all this and let’s not forget it all has to be done in distilled water which will have to be filtered after. Plus you’ll need this to cut fibers: www.asianproducts.com/product/A11115656824501810_P12089377370557351/flock-cutting-machine.html# The treatment works out something like below. It’s been a few years so I may be off on some minor things, but the basics are there. Through research you’ll find the mixtures. Hint read old and current patents and flock fiber studies. Yes countless hours of long boring text. Many times I would be asleep at the PC with 4 computers show various websites. I have a small file cabinet full of printouts…lol! I only will mix this now if I’m working on a certain color mix and need testing colors. I do the dye up first, but I’m told that you can add the dye step into this to save time and chemicals. Part 1 Light scour 20 minute stir / 60.C SODA ASH (sodium carbonate) 0.5g per liter of water Van Wet 9N9 (nonionic surfactant) 2g per liter of water. Liquor ratio= 1 part flock/ 20 parts solution. Rinse until water PH is 7-8 Part 2 Treatment solution 10 minute stir part A/ 60.C Aluminum Sulphate (A12(So4)3.18Aq) 1% of weight of flock Acetic Acid 0.5ml/ l.o.w. PH 3-3.4 Treatment solution 20 minute stir part B Flocktan 3 (Tannin acid) 1% of weight of flock Ammonium Sulphate (NH4)2SO4 (electrolyte) 0.5% of weight of flock Sodium Silicate .001% of weight of flock Retayne (CATIONIC dye fixative agent) 1 tsp. per 3 gal. Drain Spin Dry or press excess water from flock CYCLONE DRY Information of equipment needed is here: flockconcepts.proboards.com/index.cgi?board=general&action=display&thread=65Or you can save the headache of months of trial and error and wasted money or just email Jill at DonJer and ask for price quotes for the fiber size you need. It all started for me when I jumped the gun and order a bunch of stuff called flock fiber tow, which turned out to be basically long strands of nylon string that needed to be cut. That lead to the cutter, which lead to the Dye. The dyeing leads to the electro-static treatment. Since I’ve done this and worked with it so much I don’t have a problem working with the fibers act up. When they do I raise the humidity, or mist them and let them dry a few days to a certain feel etc. Fibers will either loose moisture or gain it according to the humidity in the air. Too much and there’s trouble- too little and there’s trouble. Commercially produced flock will have less trouble, but if left open or not sealed tightly it will act up as well. One key thing I have found with commercial flock is once it acts up (too dry say) it tougher to get it going again, where the flock I used to make- I could always figure something out and it would work. This may be due to my slight over treatment (an extra sprinkle here and there) on the chemicals. I added the very small amount of water glass to the mix because I like the crisp feel and how it reacts in the static field. Today’s fibers are very soft. Just know each step leads to a new one and a new set of issues. One point to remember is a little bit goes a long way. For example a s sprits of water on dry flock would only amount to a squirt of water for like 2-3 pounds of fibers. In the old days they would dust the flock with chalk. Chalk, salt, calcium, etc. are metals so they are conductive. Then consider what you are trying to flock. I had items that the flock would go everywhere but on the item. I would unhook everything and flock something else as a test and it went perfect. Then I would hook up the original piece and again the flock wouldn’t go near it. Finally after a week of this and a few all night’ers I sent the pieces back with an apology. If they could be flocked, I couldn’t do it. Who knows, once someone said maybe my work shop is special and things go smooth for me because I like working on action figure heads. It sounds like voodoo crap, but the climate around the flocking area is important according to studies I’ve read. Something I found out when a big order came in during the winter my first year. There I was with hundreds of heads and after 3 hours I couldn’t get one flocked. Back to the drawing board and I found that by raising the Relative Humidity just enough it would help. I ended up running the shower and the kitchen sink a few times that night and got the flocking done. I laugh now at these old flocking war stories and glad they are far away now… |
|
drkne
padawan Step 1
Flock Concepts Member!
Posts: 23
|
Post by drkne on Oct 5, 2012 18:47:07 GMT -5
hehe flocking war stories.
Oh I won't go quite that far with the chemicals... that's all a bit too complicated for me!
I think it's mostly an adhesive problem now... I'm waiting for some more stuff to come from Smooth-on, but I'm going to try thickening the silicone and if the fibers won't embed far enough to stay standing, I'm going to try carefully pushing them in manually while the static stick is still on, making the fibers stand up. I know it will be crazy time consuming, but if it works, hell, I'll do it!
Got some copper foil, so will see if backing a surface helps the attraction or not. Just in case it does, I drilled a bunch of holes in the head casting I made to build the wigs on. Even if electrostatic flocking won't work for me, I'll still use it for sewing wigs.
The only thing I've spent much money on so far in this regard was $110 for the static stick, but oh yeah, I've done that before, going waaaay overboard on things, because I just HAD to learn how to do it myself lol.
|
|
|
|
Post by Ray (Flock Man) on Oct 6, 2012 7:00:12 GMT -5
I wonder about the weight of the fibers you're working with? I say this because I remember some heavier baby brush fibers getting mixed into a batch I was making and I left them in as a little side test. Well, in short though the fibers jumped around in the static field- they never jumped into the glue. If I had to guess the fibers were around 1 1/2 inches long and maybe 25 to 30 denier. A bit thicker than static grass fibers.
|
|
drkne
padawan Step 1
Flock Concepts Member!
Posts: 23
|
Post by drkne on Oct 6, 2012 16:03:54 GMT -5
I don't know about denier or how I could measure that... The pieces that I have are definitely no shorter than 4mm, and no longer than 8mm. I wish I could take this workshop! www.theaterakademie.de/de/studium/maskenbild_studium/bildergalerie/floacking_workshop_mit_esteban_mendoza.htmlI've been trying to find the video I saw before about the flocking done on 101 Dalmations that turned me onto flocking in the first place and found out that Esteban Mendoza was the flocking supervisor. But all I can find about him besides movie credits is that workshop  I'd love to take that though! Looking at the face and hand flocking, what I want to do should be possible. Just wish I knew if it was affordable to do so... |
|
|
|
Post by Ray (Flock Man) on Oct 7, 2012 6:38:41 GMT -5
That is some cool stuff! Thanks for the link!
|
|
drkne
padawan Step 1
Flock Concepts Member!
Posts: 23
|
Post by drkne on Oct 8, 2012 17:31:35 GMT -5
np! If only I could speak German and afford to visit German for the class! arrgh!
Looks like they use an expensive unit though just looking at the pictures.
I'll let you know what kind of results I get when I get a chance to experiment some more. Been too busy lately to play with the dolls.
|
|
|
|
Post by Ray (Flock Man) on Oct 8, 2012 21:22:52 GMT -5
Yes it looks like a $1500 TO $3000 USD unit (should be an adjustable model up to 70kV = 70,000 volts)
I see they use the flocker first and then use light air pressure to angle it (see the brass fitting with the red trigger handle.
|
|
drkne
padawan Step 1
Flock Concepts Member!
Posts: 23
|
Post by drkne on Oct 8, 2012 21:29:59 GMT -5
aaah, that's what that is? I was really wondering what in the world that tool was.
|
|
drkne
padawan Step 1
Flock Concepts Member!
Posts: 23
|
Post by drkne on Oct 11, 2012 17:00:43 GMT -5
Alright, got the chance to do some experimenting today with some extremely confusing but encouraging results. These 2 were the best samples out of the experiments I did today: 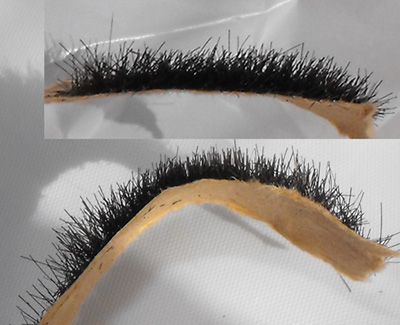 Both of them were the result of using a very thin layer of glue on paper, holding it over the flocking device and shaking the device. I did not use the ground pin. Other things I tried that didn't work: - the same combo above, with the ground pin - thicker glue - thicker glue with the ground pin - thin or thick glue on paper with copper foil backing, with or without the ground pin Oh man is this stuff ever messy. It would probably help if I could figure out a way to create a negative charge on the item I'm flocking, because clearly the ground pin isn't doing it. I bought several kinds of silicone for different experiments (sculpting stuff), so I'm going to be reading over the materials on them and experiment with one of them probably tomorrow. |
|
drkne
padawan Step 1
Flock Concepts Member!
Posts: 23
|
Post by drkne on Oct 13, 2012 12:37:07 GMT -5
Ok, actually got down to playing with silicone. The kind I have though has a very long cure time, but optimal properties for what I want to do with it. So I cast the head that I want to make a wig for and drilled holes in it for the ground pin: 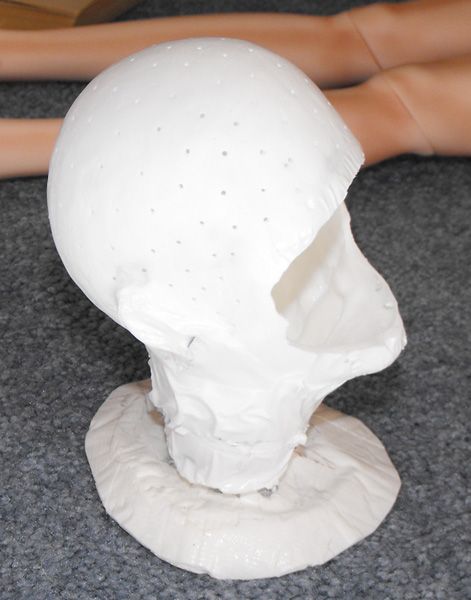 Put on the first layer of silicone, let cure for over 16 hours. turns out that silicone is actually very low on the triboelectric series list, so it has a naturally negative charge. science.howstuffworks.com/transport/engines-equipment/vdg1.htmBut it did actually work better when I used the grounding pin as opposed to the glue/paper experiment. Lining the inside with copper foil seemed to help too, but the foil is kind of thick and hard, so I need to find a way to line the inside with it closely enough. Unfortunately this experiment's results were kind of contaminated because I've learned something else new... If you keep working with the same fibers in the flocker too long, something weird happens. It's like they reverse charge or something and stick in the cup and even tries to pull the fibers off the flocked project. That's whether or not the grounding pin is used. It's kind of interesting, I had turned off the flocker, discharged it and put my finger in it to loosen clumped fibers and they all flew away from my finger. I haven't taken pictures yet of the first trial yet. The hairs didn't embed far enough, so only like half of the fibers actually stuck. Next paycheck I'm going to contact DonJer and try some of their fibers to compare. I may ask them if they might rent out one of their more expensive units for trial. |
|
|
|
Post by Ray (Flock Man) on Oct 15, 2012 2:10:59 GMT -5
Yes, even if you remove the ground or have a weak ground connection they will attract the fibers. I use this method to sort of vacuum up lose fibers around the work area.
|
|
|
|
Post by Ray (Flock Man) on Oct 15, 2012 9:09:36 GMT -5
This is the unit I use for bigger flocking work. You place the flock in the bottom and it jumps up into the glue. I made this unit so it has different electrodes and I can connect a hand held to it as well. Attachments:
|
|
|
|
Post by Ray (Flock Man) on Oct 15, 2012 9:20:00 GMT -5
In this pic you can see the flock jumping into the glue I brushed on one side of a plastic bowl. This unit works best when I put the cover and front panel on it because it throws a ton of flock around. Depending on the power supply used this unit can go over 50kV. For most things I use a 9VDC PSU and it's strong enough. At 50kV+ I have to raise the electrode screen because the spark will jump the gap. With the 9 volt it's running about 15- 18 Kv. I used a kind of dimmer switch on the power supply line to raise or lower the input voltage. It also works off my 24 volt cordless drill battery. Attachments:
|
|
drkne
padawan Step 1
Flock Concepts Member!
Posts: 23
|
Post by drkne on Oct 15, 2012 18:13:09 GMT -5
I don't suppose you make those to sell? You think a flock cabinet would work better for wigs? Here's how the first attempt worked out after I brushed off all the loose fibers (about half). 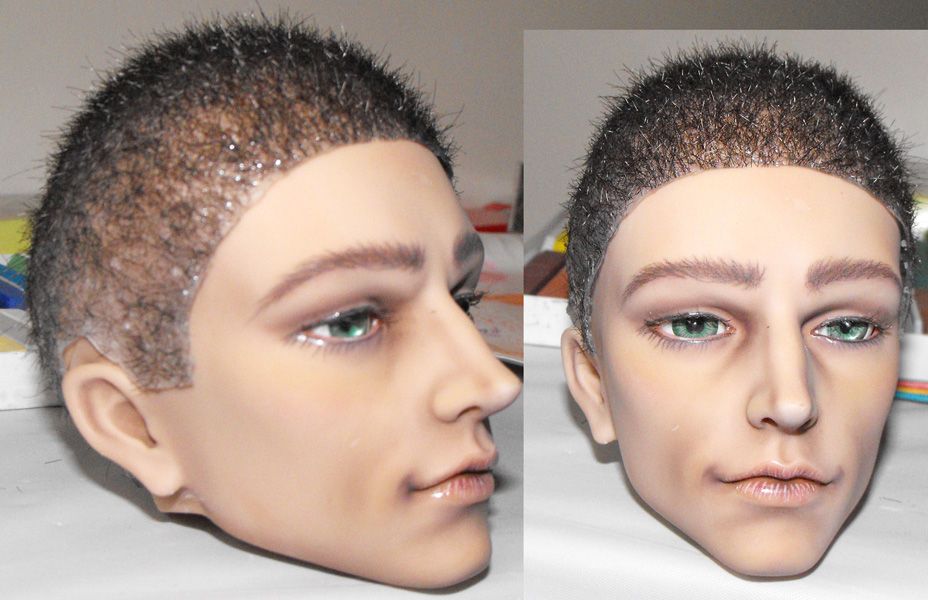 So yeah.... -_- not great, but it's a start. I wrote to Don Jer today asking them some questions like what fibers would be best for simulating hair and if by chance they might rent out equipment. |
|
|
|
Post by Ray (Flock Man) on Oct 16, 2012 7:28:32 GMT -5
I'm not sure about them renting out equipment, but it may be cheaper to have them do a sample for you and from that you can judge what the total costs will be to do it yourself.
From looking at your picture I see the potential and might try a few things-
Flock it for a much longer time.
Add some shorter fibers into your mix.
make sure your grounding it even all the way around.
Maybe think smaller by flocking in rows.
-
Other side tests I would try if it were my project-
Placing the wig base over a metal bowl or some kind of large soup ladle.
You may be able to buy a Styrofoam ball from a craft store and wrap it in aluminum foil.
I jump so much on grounding because many DC wall adapters only have 2 prongs (+ and -) and the adapters I look for and use have 3 prongs. Now this may be pointless because if you open a breaker box in the basement you'll see that the neutral white is connected to the same metal bar as the copper ground wire. That being said, I just have always had better luck when grounding to the 3rd prong.
I just know that almost no flocking project is the same. On some larger animal jobs- I have to just 3 different flocking units to work out the many different angles. In theory I should be able to hand the item in my larger cabinet and switch it on and the whole thing will flock even, but it just doesn't work that way. From what I see happening- it may be because one the flock is charged it may get sort of locked together leaving gaps. so when I see this happening I remove the item from the charge give it a tap to know off some of the loose pieces and I start again. Most times this works. Then at other times I have to switch to another device like a hand-held to concentrate the flow towards bare spots.
Then consider gravity. Shaking flock downward may cause the flock to fall over. I've seen large sheets of paper being flocked and the fibers came up from the bottom- thus gravity is keeping them standing straight while the adhesive holds them in place just enough without the fibers falling out.
Another thing to try is maybe flocking strips of thin latex foam and then glue these to the cap. As an added step maybe quickly flock between the strips as you go along. I'm just spit balling this all, but it just may be that you'll have to rethink things.
I only say all this after watching the show "How it's Made".
From that you'll see that most items made are done completely different from how we would expect.
This could all come down to the fact that any of my direct knowledge and that of others could very well be meaningless when it comes to your project. This is how I tend to think. See I had a chance to use commercial machines and compare them. From that I learned (for my flocking work) they worked the same and had the same faults. So, while one flocker and place the GijOE head on a turn table and shake a hand-held around it and it works well for them- it's not for me. Another flocker can hang a stick inside a flocking cabinet and the head is flocked- that wasn't for me. On the same token, the way I do it may not work for many others.
That's why you must take any of our advice with a grain of salt because most members here do their flocking completely different. Even though the concept is basically the same. Your unit may not be what is needed to flock the entire wig cap, so this may lead you to either think in smaller sections or figure out another way. This is why I don't have cut and dry answers for you. I do know that I can see you are motivated to find a way and this is why your project captures my interest. Just a thought here as I type this- I wonder if you were to root some of the hair the normal punch method and then flock some to fill in the rows punched? I'm trying to think of a good test you could run that could confirm everything you are currently doing.
I wonder if you took some elmers glue and coated your finger, then while holding the ground clip flock your finger (of course while keeping the flocking unit at a safe distance.)
I say this because sometimes while holding a project piece and flocking it- the flock will thickly coat my hand, but thinly coat the glued up project piece. I assume this is because we're conductive. My thinking is, if your finger gets a good coverage, maybe you can start working on why. If it doesn't then maybe you could start looking at your fibers or even the true power of your device.
Another test would be to buy various flock sizes and work with them until you can get a thick even coat - working your way towards your goal flock fiber size.
|
|
|
|
Post by Ray (Flock Man) on Oct 16, 2012 7:57:22 GMT -5
I almost forgot...
To put a machine like the one shown above would cost around $400 or $500 to make. while it cost me a little less because I used parts and pieces from around my shop and the fact that I don't consider the time to do it.
Parts it would run around $280 on the low end and around 24 to 36 hours of building and testing time. Then consider it was built to flock 1/6th size horses and other 1/6th animals- along with a few side craft projects my sister has from time to time. It's around 22 inches wide- 16 inches deep- with a work area of 16”x 12” inside.
I can't say for sure how it would work with your fibers. It seems to me to be a high price for an "IF".
On the flip side you could be looking at $5000+ on a commercial unit and still have the same "IF" factor.
This is why I say, work with some smaller fibers and build your way up. This way you'll know what you need and how you want the finish to look- plus how to achieve it.
Below are some of the others I use.
|
|
|
|
Post by Ray (Flock Man) on Oct 16, 2012 8:09:51 GMT -5
This is my main unit. it gets the most use day to day. Attachments:
|
|
|
|
Post by Ray (Flock Man) on Oct 16, 2012 8:10:53 GMT -5
This is the backup or when I'm working with multi-colors. Attachments:
|
|
|
|
Post by Ray (Flock Man) on Oct 16, 2012 8:12:25 GMT -5
This is one hand held with the grounded work box. Attachments:
|
|
|
|
Post by Ray (Flock Man) on Oct 16, 2012 8:13:54 GMT -5
...and a 2nd hand unit with the normal ground clip etc. I have one more that has a mix of a puffer bottle and the electro-static, but I don't have a picture of it. Attachments:
|
|
drkne
padawan Step 1
Flock Concepts Member!
Posts: 23
|
Post by drkne on Oct 16, 2012 19:08:14 GMT -5
Once again thanks so much for all the information!
Definitely lots of useful information in there and some things that I want to try.
I still haven't heard back yet from DonJer :/ Maybe my email was too long and it's taking them some time to answer everything.
Unfortunately the Scooter Static Stick is 2 pronged... and I'm not mechanically inclined enough to be able to do anything about it if that was possible.
I definitely get a lot of fibers sticking to my hand no matter what I do but the amount that was sticking to the project varied depending on different things that I was trying at the time. Oddly in the beginning when I had the grounding pin stuck in the silicone a lot more fibers were going to my hand than the silicone. When I removed the pin more fibers went to the silicone. But adding copper grounding inside the head and connecting the ground pin through the scalp into that seemed to help. Unfortunately by the time I reached that point the fibers were getting overcharged I think.
When I first started flocking the silicone cap I tried just a 1" section and then had a "duh" moment, because I can't believe I didn't foresee the results... silicone is like a soft rubber and attracts dust and hairs which stick to it like crazy and it's insanely hard to get stuff off it without running it under a faucet or something. I'd have to wait a few hours for a full cure between sections so I could rinse. It's still a possibility, just a very time consuming one.
The other biggest obstacle to flocking in sections, after starting with that 1" section: when I applied the adhesive layer of silicone, even though it wasn't very thick, but it still has a slight doming effect around the edges so the hairs on the edges stuck out more sideways. So it was hard to lay down adhesive next to an existing strip. There was a very visible seam.
Sections might be more workable if I end up trying clear plastic instead of silicone. I was considering this in case the edges of the silicone won't stick close enough to the head to look realistic. Was hoping to stick to silicone though because then it might be possible for other dolls to wear the same wig. If I went for hard plastic it could definitely only be used for a very specific model. I'm not completely certain of the structural integrity of using plastic in the thickness I'd be using it for the wig either. It's got a pretty thin viscosity so I'm not totally sure how I'd taper the edges although i do have some ideas.
|
|
drkne
padawan Step 1
Flock Concepts Member!
Posts: 23
|
Post by drkne on Oct 20, 2012 22:10:13 GMT -5
It's been nearly a week and DonJer hasn't answered my email :/ I'm going to call them Monday.
Was at the local Gameworks shop and they had some dark brown 3mm fibers that I picked up. Don't really know if they are properly treated, but just one more thing I thought I'd experiment.
It's been taking me some time working on the new head stand. I ended up with a clump inside that I'm trying to dremel out but it isn't easy.
Even waited for a non-humid day with temps in the 70s to get an optimal cast, but the silicone still ended up tacky :/ I guess I didn't mix it well enough, but it still worked well enough to cast the head stand. I just screwed up while rolling the resin around inside while it hardened. Let the clump sit in the wrong spot. It's really hard to get it right.
|
|
drkne
padawan Step 1
Flock Concepts Member!
Posts: 23
|
Post by drkne on Oct 23, 2012 20:24:03 GMT -5
Alright, finally got the new head stand done which resulted in 3 bandaids on my fingers. Turns out that copper foil tape is VERY sharp. This version has only one hole for the grounding pin because the extra holes just created silicone pegs that were hard to trim and just made the wig stick out from the head in an undesirable way. The copper lining is the grounding to create a stronger pull for the fibers. 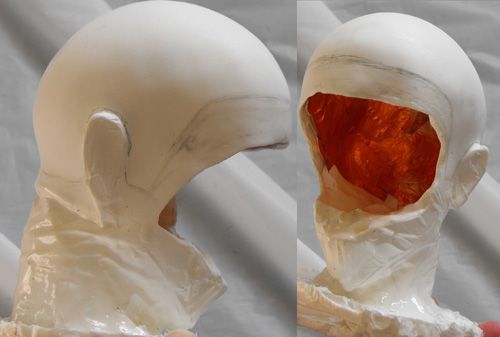 I was picking up some spray a Gamesworkshop and they happened to have some 3mm flock, so even though that's way shorter than I want myself, I bought it to experiment with while I'm waiting to receive real flock fibers. Also called Don Jer back, because it had been over a week since I emailed them about flock fibers and they hadn't responded. The lady was very nice. She answered a lot of questions and she is sending me some samples of different lengths to try out. Can't wait to get them! Second try involved seeing how it worked out just trying one medium thick layer of silicone and flocking it right away using the 3mm flock that I picked up. From this, I learned that a thin layer of adhesive is best, because the fibers soak up the adhesive like a sponge and that causes swampy-like areas that mat down the hairs. So another silicone cap is curing tonight and I'll try flocking that with thinned silicone tomorrow. *crosses fingers* As far as I can tell, the copper lining seemed to have helped. Shorter fibers are easier to work with, longer ones being a totally different animal, but just the way that the fibers acted I'm thinking a combination of the 2 factors made this try work out a bit better in spite of the thick silicone problem. But here's a look at the 2nd experiment:  |
|
drkne
padawan Step 1
Flock Concepts Member!
Posts: 23
|
Post by drkne on Oct 24, 2012 19:49:45 GMT -5
grr... this is going to take some real training. It's taking a while to learn how thick I need to make the cap in various places. Think it's best if I make it thick up to 1/4 inch from the edges and the sideburns will have to me thick to lay on the face, because too thin and it peels up at the bottoms. It's really hard to get the thickness even when laying it on. You can see when I did the adhesive layer I missed or made it too thin in some spots, so there's some bald spots just because of that. Since this this batch of fibers was on it's 2nd try already they stopped working too early in. I have yet to figure out how to get fibers to work again once they've been used, although you're supposed to be able to reuse the loose/fallen fibers. Overall it's progress though and it's hard to see in the pictures because this camera I have keeps focusing on the background instead of the foreground :/ but this one his nice and fuzzy. In the picture with the flash, the light makes the silicone reflect so you can't tell in that one, but you can see the direction of the hair better in that one. You can see that on this try I was able to use a straw to blow the hair in a specific direction.   |
|
|
|
Post by Ray (Flock Man) on Oct 25, 2012 14:56:50 GMT -5
Now do you do these test runs with an easy to remove glue or are you using the silicone every time?
When I do color mixing and test out the mixes I use wood glue so once it dries I can pop it off and do more testing. This way I can use the same heads (all of them damaged and only good for testing). I do this also on other objects that people ask me to flock. I'll first do a test run and see how things work out and what I need to change- then if all goes well I redo it using my norm epoxy mix. This way it saves epoxy and the task of trying to remove the dry epoxy. On some tests where the wood glue doesn't work right I use an acrylic glue, that later can be peeled away easy.
It does look like you are on the right track. I think once you can get a good even coat using the shorter flock you'll be ready to work on using longer and longer fibers- learning what needs to be done differently for each size as you go along.
|
|


 I'd love to take that though! Looking at the face and hand flocking, what I want to do should be possible. Just wish I knew if it was affordable to do so...


